4 Easy To Follow Tips For Embroidering Caps Effectively

Sewing and embroidering have been in the cultures around the world ever since a long time. While most of it has been deployed for commercial practices, like for making uniforms and standard monograms on specific wearing, there still are people who practice the subtle art on a hobby basis. They might even be opting for a small home-based embroidery business.
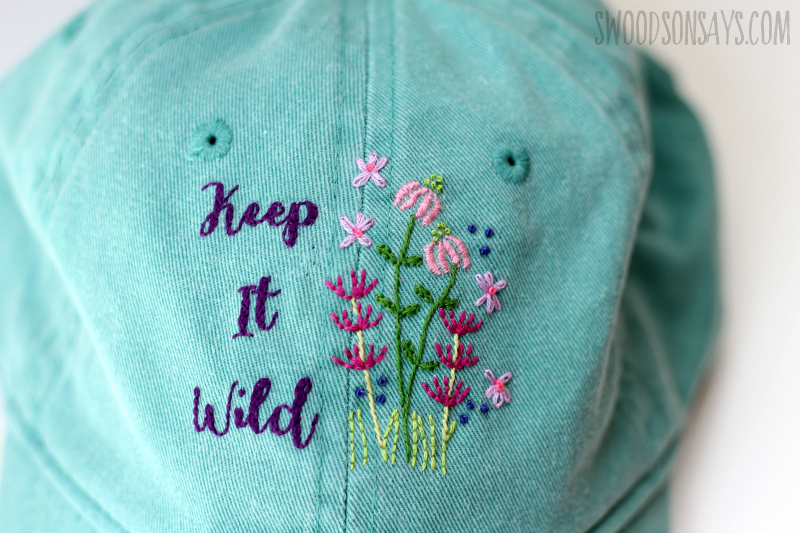
From the several clothing items, the item that is often ordered to be embroidered is the cap. It requires specific levels of precision on the craft to get the accuracy with the display. You can read more on cap embroidery and follow the below-discussed tips for embroidering caps efficiently.
Preventive Maintenance regularly
Embroidery is a work that requires efficiency on the part of both the worker as well as the machinery. It asks for powerful yet fluid motions of the machinery. Therefore, it is essential for the machine to be greased-oiled and cleaned on a regular basis to get the most out of it. Especially, the bobbin area often needs cleaning and oiling. You should look for threads build up around the rotary hook or the shaft which can cause the needle to get too close to the rotary hook point. This can cause a rise in the timing of the machine.
Proper hooping for Good Cap Embroidery
Often most of the issues that arise in the embroidering process come from improper hooping. In order to get smooth and efficient embroidery on the caps, make sure to hoop them tightly.
For this, make sure that the brim of the cap is fastened securely with the band of the ring. Pull down the hooping to the maximum extent possible. This will reduce and minimize the space between the cap station and the cap. The flatter the cap during the process, the lesser issues will arise during the embroidery.
Make provisions for registrations
The door of the bobbin is not easily accessible all the time to the user unless the cap is removed. As such, there is a need to make sure that there is a full spool of bobbin available for the task. This will help in making sure that there is uninterrupted embroidering and will help in thwarting any possible delays. Usually, when the bobbin is finished, the weavers replace it but it can cause shifting of the design which means a lack of precision in the final product. Thus, ensuring a full supply is essential.
Design placement and size
Mostly, the needle tends to break near the bill area. But if the design is correctly positioned and is in the right size, this condition can easily be avoided. For this, the user needs to make sure that the design remains approximately half an inch from the point where the bill meets the seam. For getting the optimum results on this part, make sure that the average size of the cap that is to be designed is around two and a half inches tall. But this also depends on the profile of the cap and the purpose and age group of the wearing person.
Caps is a particularly difficult and more prone to problems in quality. And if your not careful, poor quality can happen faster than you think.
Running Your Embroidery Machine Too Fast
The best guidance for making the best weaving is to back off! For an ordinary cap plan, a machine should run at around 600 lines for every moment with a cap outline and around 750 for a level. Obviously, this is only a proposal. Each plan will be unique. You should in every case moderate your framework down if a plan has some complicated subtleties or little letters.
In instances of unpredictable weaving plans, you can improve enlistment by easing back down to around 550 fastens every moment for cap outlines and 650 lines for each moment for pads. Hindering a weaving machine will do it right the first run through, just as setting aside cash by maintaining a strategic distance from the squandered item.
Speed won’t make any difference at all on the off chance that you convey a low quality item to your client.
Covering your bases yet experiencing difficulty weaving covers?
Previously utilizing tear-away sponsorship and 80/12 sharp point needles?
So what gives?!
Weaving machines are intended to weave on level pieces of clothing and, hence, require exceptional consideration while weaving on bended surfaces.
That doesn’t mean weaving covers is unthinkable, however. Truth be told, more often than not, cap weaving botches come from client mistakes.
Caps and covers… only one of the many apparel articles we as embroiderers will have some good times and be innovative with. Covers are a staple of the weaving industry. As per an overview quite a while back, more than 80% of benefit causing weaves to do covers. That being said, it bodes well to require some investment to figure out how to sew on them.
That is the reason we made this blog to assist you with abstaining from committing errors that continue to cost you time and cash!
Conclusion
With all the assortment of covers out there, it’s acceptable to have the option to give similar assortment to positions. Using the sides and backs of covers can give inclusion right around the cap. That ought to fulfill even the most requesting of clients. Simply make certain to follow the tips plot above.
Follow the means above and you shouldn’t have any issues.